How to set up an SSO connection to S-360
Here are the instructions to set up an SSO connection to S-360.
Ask the future SSO client to provide you with :
- An X509 certificate used to sign the SAML request. This certificate can be auto-signed. It may be a certificate used specifically for that purpose. You can use the following site to validate it : https://www.sslshopper.com/certificate-decoder.html
- Login url of the caller website
- Logout URL of the caller website.
Then, you'll have to choose the IssuerId of the SSO interface. It has to be a short string. I recommand : SsoMyCompany if MyCompany is the company doing the implementation of the SSO integration.
With all those information, you are able to do the SSO Setup in S-360 screens.
Go to :
- Organization context
- Initialization menu
- Sales Channel screen.
- Select the Sales channel on which you want to SSO and click on point of sales
- Select the Point of sales on which you want to SSO and click on social network
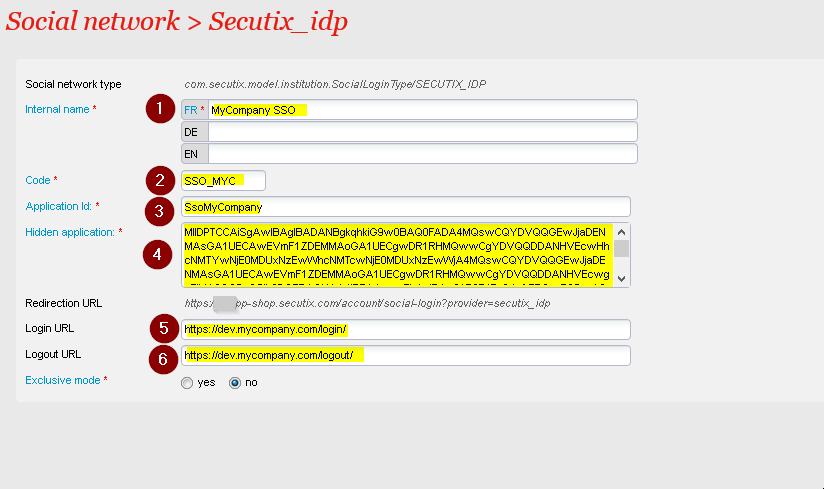
- Create a new social network connection of kind S-360 (and not "S-360 Service Provider. You must read SECUTIX_IDP at the top of the window, see screen capture below)
- Fill the screen with the following data:
- Name of the connection - choose freely
- Code of the connection - choose freely a 8 characters value.
- Application id : paste here the IssuerId
- Hidden application : paste here the X509 certificate without the --BEGIN CERTIFICATE-- header and footer.
- Login url : paste the login url
- Logout url : paste the logout url.
- Save and quit
- Do not forget to activate the connection.
Beware : modifications on this setup may take up to 10 minutes to be applied, due to caching.
